Sketching anime characters can be a little trickier than drawing regular characters because you typically have more alternatives. But the fundamental strategy is the same. For novices, we offer advice on how to draw anime characters step-by-step.
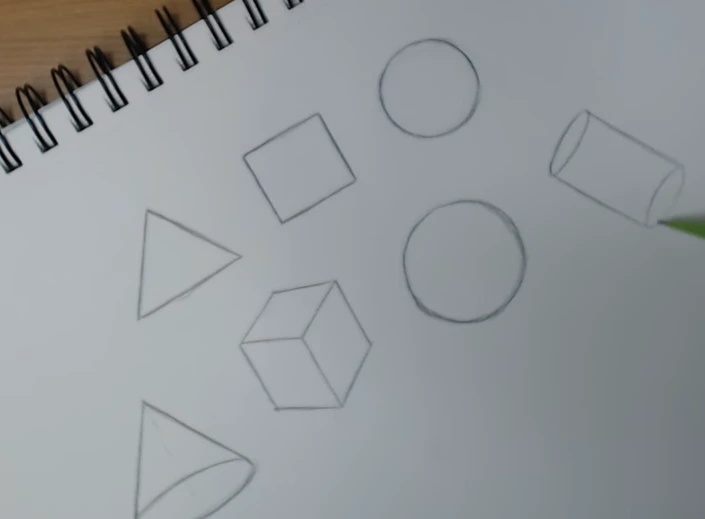
Manga, or Japanese comic books, are where anime illustrations are most frequently employed. Cartoon animation is a favourite of both young and old. This article will demonstrate how to draw anime characters in the convenience of your own houses. Start with squares, circles, and rectangles when learning how to draw anime.
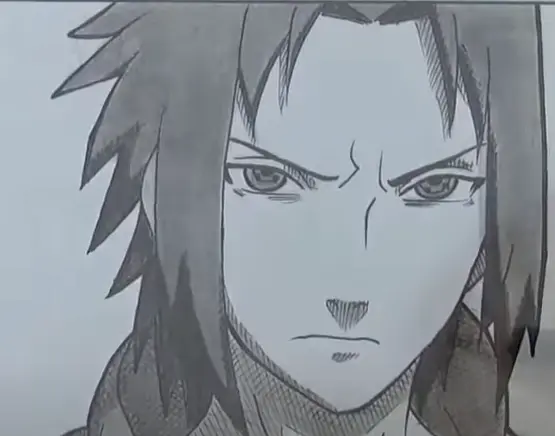
One of the drawing techniques that makes it very simple to adjust a character’s emotion is anime. The secret is knowing which elements to modify in order to communicate the expression and emotion. You should be able to easily alter your characters’ facial expressions once you figure this out.
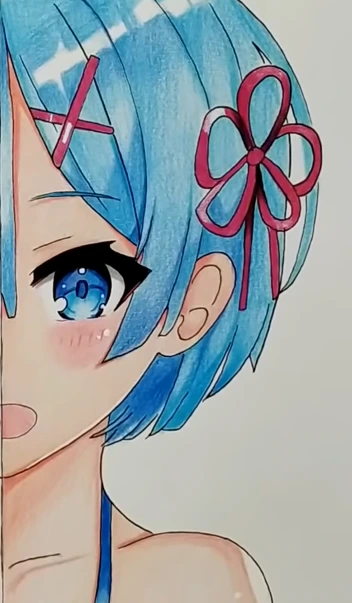
Study the art of drawing anime eyes. In anime, one of the primary ways expressions are communicated is through the eyes. Although they are frequently extremely huge, there is much more diversity than most people realise. Examine the numerous visual motifs used in popular anime to determine what eye type best suits you.
Despite being a cartoon type of art, anime contains certain real-world references.
Simple ways for sketching anime character
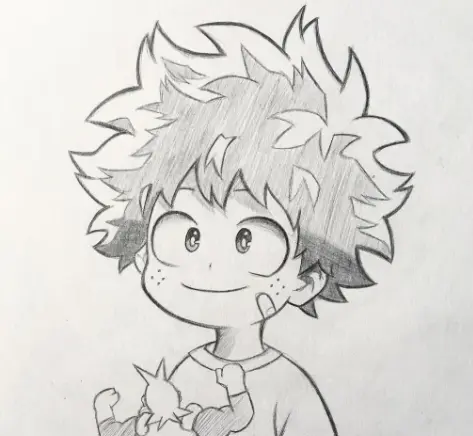
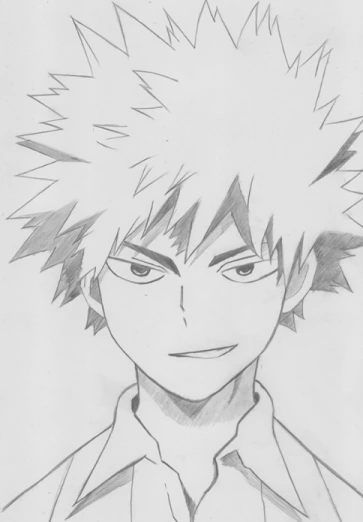
Anime characters are distinctive and entertaining to draw because of their big eyes and distinctive facial characteristics. The five steps to sketching anime are outlined here, along with advice on how to get the proportions correct, ideas for various anime hairstyles, and directions for drawing the famous eyes of anime.
Generate the Face Basic Structure
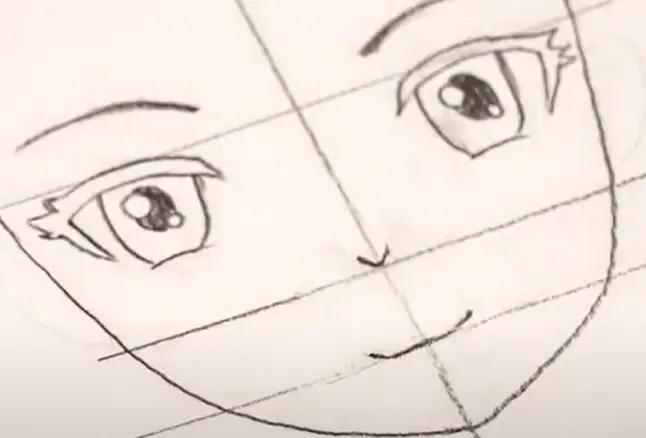
The general shape of the character’s face will be created first. Artists may have different tastes for how to draw an anime character’s head and face, but they all begin with the same fundamental idea: Draw a circle first, then a horizontal line and a vertical line passing through the circle’s centre.
Typically, you’ll place the nose between the eyes and the mouth, the eyes on or just below the horizontal line, and the mouth at the bottom of the circle. Below the circle, the chin will descend.

Draw Other Features on Face such as Eyes, Nose and Mouth
Here are step-by-step instructions on how to draw anime female eyes for beginners because anime characters are famous for their eyes. Draw a short line that extends downward from the outer side of the eye after first sketching a curled upper eyelid.
For a softer look, leave the inner surface of the eye exposed. The iris is then added as a circle in the centre of the eye. In the centre of the iris, draw a tiny circle to represent the pupil.
Add one or two more circles to the iris to produce direct and indirect light reflections. In order to create a gradient as you fill in the pupil, make the top part of the form darker. Ensure that the light reflections are left white.
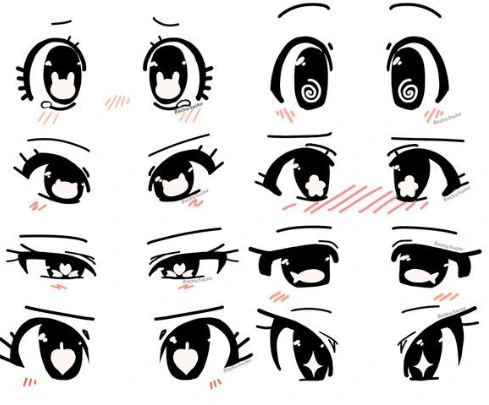
Add eyelashes to the top and bottom of the lids last. Naturally, there are other alternate techniques for drawing anime eyes, so be sure to experiment and develop your own style.
Usually, the nose and mouth of the character will be much smaller and less complicated than the eyes. For instance, the nostrils, which are represented by two tiny lines, could serve as the nose. The mouth could also just be a straight line.
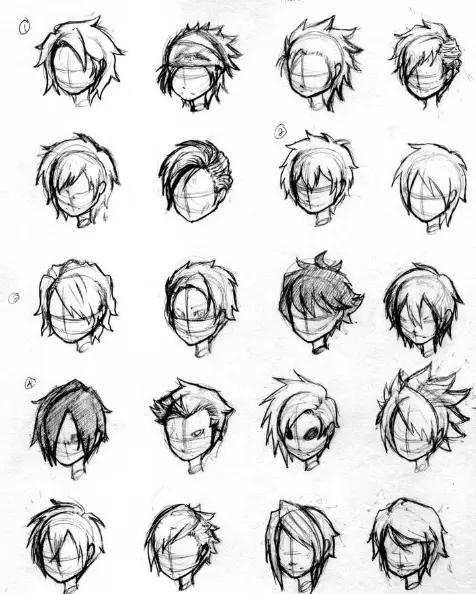
Adding the hair to the character
There are a few options for drawing the hair while learning how to draw anime for beginners. While some artists choose dramatic, geometric approaches, others like a more fluid, free-form approach.
Start by drawing bangs down to the eyes in the manner shown in the picture below using rapid, light strokes. Afterward, start drawing the remaining hair to frame the face.
Make sure the hair rises above the first circle you drew on the top of the head. In other words, the hair should have volume above the character’s head rather than lying flat against the scalp.
Try out different anime hairstyles for both male and female characters as you draw more and more.
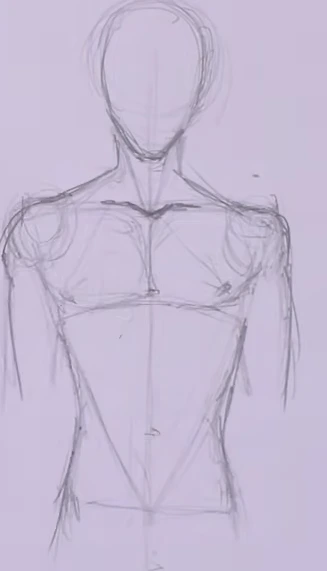
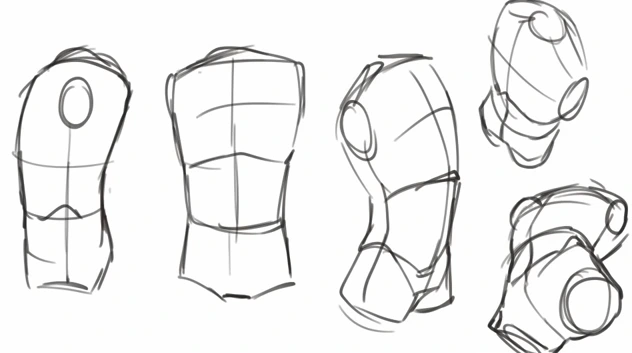
Drawing the main body of anime character
Again, if you want to build a flawless body, you need start with a structure. A rectangle is typically used for the chest, followed by tiny circles for the shoulders, leg, and arm joints, and an oval for the hips. You are now prepared to join these forms after completing that step.
From the chest to the hips and the neck to the shoulders, draw curved lines. The body should eventually resemble an hourglass. After that, you can add arms in any position and legs that are narrow from top to bottom.
Here, you can use tiny circles to help you distinguish between the upper and bottom portions of the leg.
You can begin including details, such as hands and shoes, once the major components are finished. Drawing two progressively wider lines and creating a rectangle beginning on the left side is the first stage for the hands. Drawing a second line to depict the knuckles is the next stage.
Then, divide the finger-shaped object into two slightly symmetrical halves, and curve the straight lines. It’s time to join all the lines you previously drew together to form fingers. The basic idea is always the same: draw an outline and connect the spots. You can use different hand positions for this.
It’s simpler to draw shoes than to draw hands. Make the outline of the shoes substantially wider than the feet after sketching the feet in the desired location. Get rid of the foot line.
Then, add some finishing touches, such shoelaces and shoe design.
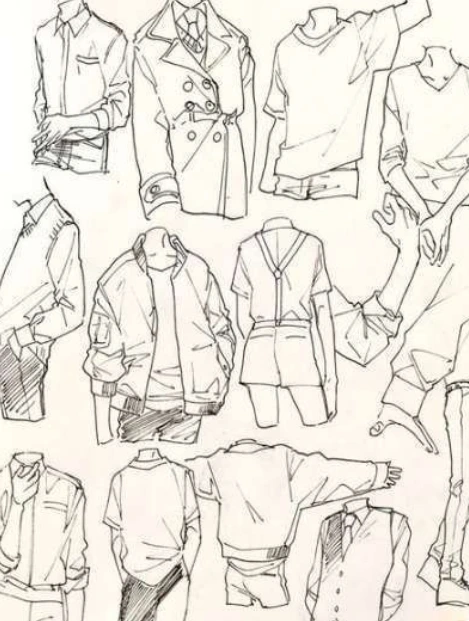
Drawing the clothing
There are many clothing options available for an anime character. However, depending on gender, a combination of a tee and jeans or a shirt and skirt is the easiest alternative for a beginning.
To draw a shirt or t-shirt, start by making a sketch like you would for the other elements. Draw a rough border around the body and arms. If doing it directly is difficult for you, you can make a shirt out of a basic geometric shape.
If you do this, you can later curl the lines to fit different body types. Afterward, if it is a shirt, add the collar. In order for the collar to look to have some volume, be sure you draw the collar’s outline sufficiently away from the torso and neck.
Continue adding features after drawing the outside. Add creases to the elbow, waist, armpit, and breast. Don’t forget to embellish the shirt with buttons. One might think that drawing a jean is the easiest step. Simply create loose, curved lines along the body lines as the lines for the legs are already drawn.
Once the leg shapes are complete, remove the lines and add wrinkles, paying specific attention to the ankles. Add the button and a little zip-related shape last.
Follow the same instructions to draw shorts, but make them shorter at the knees rather than covering the entire leg.
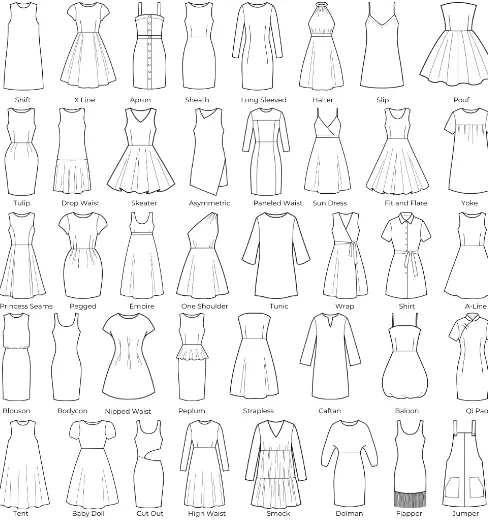
Restart with the outline to draw a skirt. Draw a number of vertical lines to represent the folds’ dimensions. It’s important to keep in mind that the folds in this particular design point one way and softly curve the other way. Last but not least, give your character some colour to make it seem more appealing and alive.
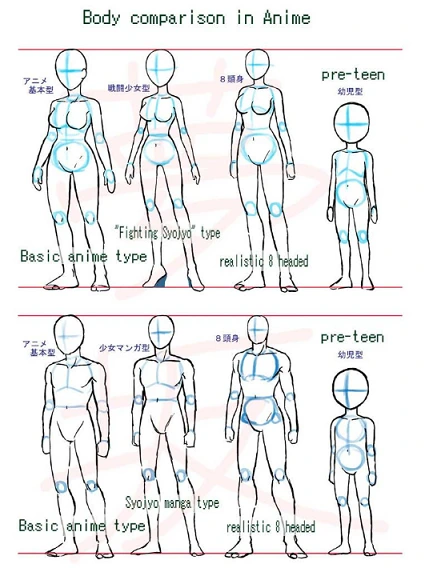
In order to draw anime characters perfectly, it is crucial to understand their body types. You should always begin from beginning when drawing a figure. To put it another way, don’t forget to start with a drawing. Then, you can add as many information as you like.
Finishing the drawing by adding details
You should now have a complete sketch of your anime character. You can now add specifics like clothing and footwear. Once you’re happy with the drawing, ink over the lines to complete it.
While you’ll primarily use a black pen for inking, it can be useful to also have a white jelly pen on hand for adding highlights, such as the reflection spots in the character’s eyes.
Additionally, you have the option to add more colour with coloured pencils or any medium of your choosing. Continue to build on the foundation you create once you master the fundamentals of drawing anime characters.

For instance, practise drawing people from various perspectives and in various stances, and experiment with various hair, clothes, and facial expression options. You may develop a signature style for your iconic anime artwork with patience and effort.
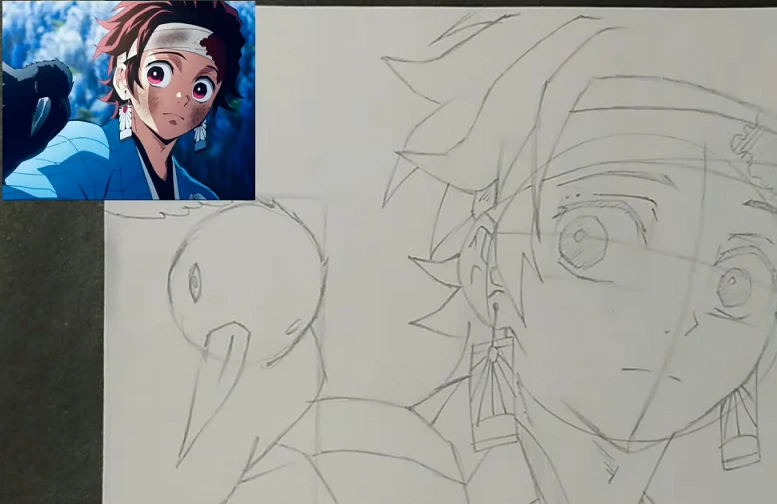
Follow the following video to see simple sketching of an anime character.

Tips for making good anime drawings
It’s awesome to draw anime characters. But if you’ve never drawn before, you should start by mastering the fundamentals. Draw elementary objects like straight lines and fundamental shapes like squares and circles. Although somewhat monotonous, this will help you advance.
Continue creating anime and other types of art. Spend a few minutes each day practising the fundamentals of drawing before moving on to more enjoyable or intriguing subjects.
Learn to Sketch Basic Shapes
It’s fascinating and appears to be somewhat difficult to draw anime characters, but surprisingly, all of your favourite characters—from the simplest to the most intricate—are created using basic geometric forms like circles, squares, triangles, and so on.
First, work on your fundamental drawing skills. Practice basic shapes including circles, straight lines, rectangles, ovals, and other such forms. This may sound monotonous, and it is. You must first learn simplicity in order to develop complicated buildings. You’ll be able to sketch better and have more creative ideas as a result.
For a few minutes each day, practise drawing these simple shapes. Then, sketch everything that comes to mind. You can try combining these fundamental forms to create actual human figures.
Understand view point (perspective) Drawing
Perspective is the idea that objects get smaller the more away they are. If we were to examine a cube, this would be a good illustration. Despite the fact that all of its sides are equal, the sides closest to the viewer will appear smaller. This will be more obvious the larger the object.
This effect is taken into consideration and accurately and realistically shown in perspective drawings. Drawing simple three-dimensional shapes from various perspectives, such as cubes and cylinders, will help you improve. This will assist you in drawing more intricate shapes and perhaps anime characters in the future.
One-point, two-point, and multiple-point perspective drawings are all possible. When you stare straight ahead on a road, you are experiencing a one-point perspective. Complex objects like buildings, cars, or people are examples of third-point or multi-point perspectives.
You should start by drawing a cube, then move on to other forms like cuboid, cubical, and spherical before moving on to more sophisticated structures like a bed, cabinet, and so on. The third-point (or multi-point) perspective and the bird’s-eye view are frequently contrasted.

Learn to draw the Anatomy
To sketch humans, you don’t have to be a doctor, but having a fundamental understanding of anatomy would be quite beneficial.
Drawing blunders can be avoided if you are aware of the sizes and positions of various body parts. Although some proportions in anime may be exaggerated, overall, manga and anime characters are typically based on real anatomy.
When it comes to anime and manga, it actually sort of works if the characters aren’t exact replicas of real people. However, by providing them the proper body type, you can enrich their personalities and make the characters’ ideas and emotions more relatable to the audience.
The good news is that basic anatomy isn’t particularly difficult to understand. Steps 1 and 2 have already been mastered; all that is left to do is integrate the two steps and practise the anatomy.
Make sure you are familiar with the sizes and locations of the various bodily parts before proceeding. In other words, before you intend to break the rules and try to shape your unique character, you should first be familiar with the rules (basic anatomy).
Learn Shading Techniques
The use of shading provides your drawing a more realistic appearance. It improves the two-dimensional object and gives it a three-dimensional appearance.
Consider how items with various sizes and surfaces reflect light as you practice shading. Everyone still follows the same fundamental rule, which states that an object’s side facing the source of light is its lightest and its opposite is its darkest.
Correct shading not only enhances perspective but also conveys information about the surroundings, the time of day, and the weather. Think of a character who is depicted as being outside on a sunny day.
The character’s shadows are very crisp, as you must have already surmised, and there is a stark contrast between the areas of light and darkness.
Shade is rarely utilized to depict shadows in anime or manga unless it is necessary to describe the situation.
Learn Coloring Techniques
Learn at least some of the fundamentals of color theory, such as warm and cool hues and complimentary colors, in order to properly use color. If you need assistance remembering which colors are which, you can always have a look at a color wheel.
The complementing colors are those that are opposite one another on the color wheel. Yellow is an excellent example of a warm hue. Blue is one instance of a cold color.
You may make an anime character look more intriguing and lovely by using the proper color combinations.
If the characters are meant to be plain and straightforward, you can draw them wearing white clothing. Red is often used to represent fury and anger as well as someone who is vivacious and wants to stand out.
For girls and boys, pink and blue are frequently utilized, accordingly.
Take help of a Reference Material while Sketching
It is always a good idea to have some reference material on hand when drawing, especially if you are just starting out. This can include actual or fake people, objects, animals, or both. It’s pretty uncommon to get everything right on the first try. Starting with reference material is preferable.
Sometimes, what you assume will work best won’t function the same way in practise. Start by looking up other, comparable figures if you’re depicting a historical figure.
To determine the types of characters they are, look at their characteristics such as personalities, heights, skin tones, and drawing style.
Additionally, you can follow particular manga creators, and you should definitely look at other people’s work, particularly if you are just starting out.
The majority of well-known painters have distinctive styles, but you can also look at images or draw inspiration from actual items, animals, or people.
Be persistent and continue practicing to improve
It’s difficult to learn how to sketch. It necessitates patience, time, and a great deal of work. But being able to monitor your own progress may also be incredibly satisfying.
There may be instances when it seems like you are not making significant progress or that your drawings don’t turn out the way you want them to. Don’t allow this to depress you. Take a rest or try once again tomorrow. You should eventually improve with practise.
You may always look at the works of other creators by watching anime or reading your favourite manga if you ever need inspiration.
Even though it’s likely that things won’t go as planned, try not to let this demoralise you or sap your willpower. Take a rest, then try again the following day.
If the drawing is still subpar, you still need to learn the fundamentals and a few perspective tricks. Build solid foundations first, and more complex constructions will be simpler to construct.
Summary
A lot of people have the eagerness to create anime and manga characters at home. It is not as difficult if you follow the steps outlined here carefully.
There are a lot of materials available online including anime character ideas. Go to Pinterest or YouTube and search how to sketch your favorite character.
Keep sketching and drawing and practicing to get better. If you liked this tutorial then please share it among your friends, family and colleagues.
You may share any interesting tips or ideas if you have in the comments section for the benefit of other readers.
Read Also: