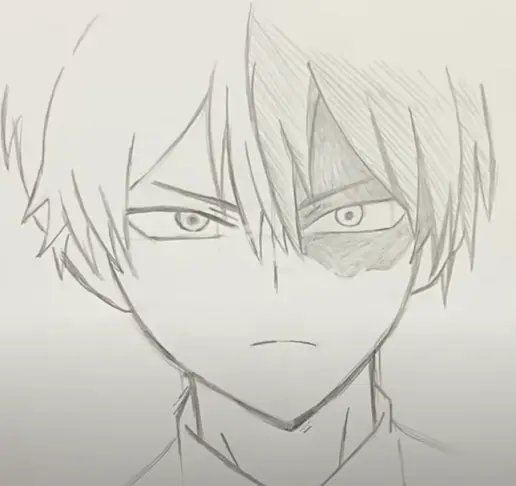
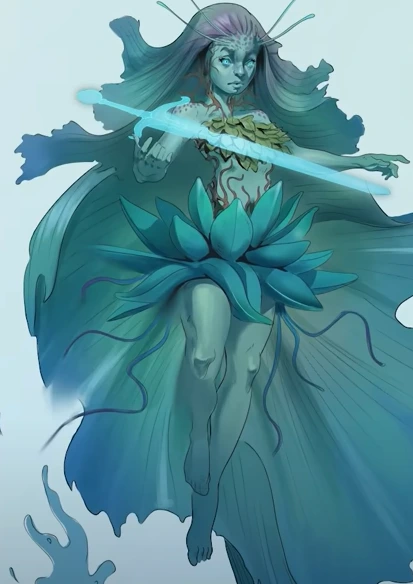
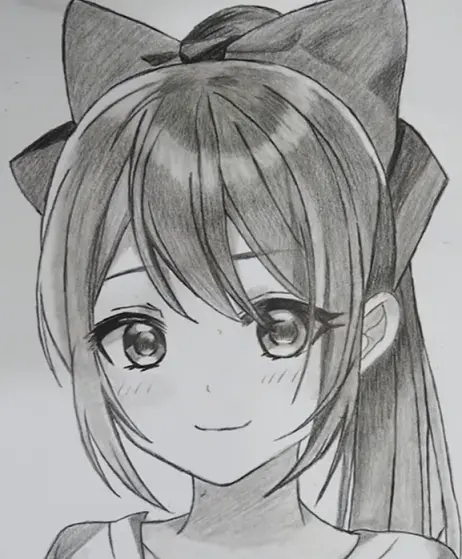
Japan gave birth to the well-known animation and illustration genre known as anime. It can be intimidating to create anime characters, especially when you compare your own drawings to those of your favorite works of professional animation.
Fortunately, anyone can learn to draw anime characters, and if you break it down into little pieces, the procedure is very easy. Around the 1960s, hand-drawn and computer-animated figures first appeared in anime in Japan. Today, the cartoon and humorous style of anime is well-known throughout the world.
Whether you want to sketch by hand or create using a computer or tablet, learning how to draw anime is easy. Better still? There are many different styles to start with.
Read Also: How to draw anime character – steps with pictures
Tips for drawing Anime or Manga Characters
Start with drawing their head and face so you may sketch what they seem like if you want to draw your favorite character or create one on your own. Draw the basic forms and the head’s outline before adding the features to ensure optimal placement.
- You can remove your lines after adding the eyes, nose, ears, and mouth and then doodle in a hairstyle. You can create anime faces in no time with a little perseverance and practice!
- Anime has a distinctive aesthetic. There are some guidelines to adhere to when drawing anime. What’s most significant about the emphasized features
- Eyes. Almost half of the character’s face is taken up by their huge, constant eyes. Additionally, they frequently have colored outer rings with black circles in the middle. Exaggerated coloration is another possibility; certain eyes, for instance, may appear purple. Hair.
- The hair in anime is frequently quite odd and unnaturally shaped. The hairstyles of the figures are always overdone, and the colors might also vary greatly. expressions on the face. Interesting messages can be transmitted through facial expressions.
- Tears in the eyes, for instance, are an indication of humiliation. The characters are highly emotive due to the exaggerated facial expressions.

Remember that you can learn to draw anime even if you are just starting out; you just need to practice. Never give up! Additionally, you can transform anything into an anime thanks to the versatility of anime drawings. even a picture of yourself. To assist you get started with face, body, and facial expressions, we have created a few step-by-step lessons for beginners. So, if you continue to practice, we believe you’ll get better and better.
Following are the basic tips you can follow for making amazing drawings.
Learn to draw line drawings
- When you are certain that everything is in its proper location, trace over the light lines you initially used with darker ones. This will be especially useful for designs that are vast or intricate.
- Light lines are simpler to draw, easier to correct if you make a mistake, and require less force from your hand because you don’t have to press as hard.
- Making a rough sketch first and adding smoother lines afterwards is a smart practice even when sketching digitally.
- Another activity to help settle your hand is to trace your own lines.
- Try to use as few lines as you can when drawing.
- It’s acceptable to add additional lines if your first line is incorrect; however, avoid adding lines only for the purpose of adding more. Erase that section of your drawing if you make too many mistakes, then start again.
Make use of “guide” lines
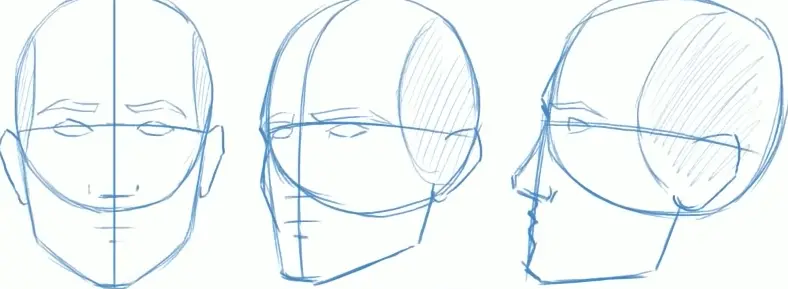
- Use guiding lines to assist you in drawing. For instance, to draw a symmetrical head and face from the front, you can start by drawing a horizontal line through the center of the face.
- You can use this line to help ensure that the width of the face is equal on both sides.
- To help you ensure that both eyes and ears are at the same level, you can then draw a horizontal line (or numerous lines).
Make a plan of overall drawing
- Before you begin drawing, make an estimate of your proportions. You will be less likely to make a mistake by contrasting the sizes of various components or things in your picture.
- Whatever you are sketching, start by drawing the largest forms first. It’s not necessary to always begin with the largest shape, but you shouldn’t begin with the finer details either.
- Start with the head when drawing someone and work your way down through the rest of the body. Wait until you have the overall outline of the body before drawing the finer details, such as the facial characteristics.
- This method of drawing will make it much simpler to correct errors.
- For instance, you might discover that the body doesn’t actually fit on your drawing space if you fully sketch out the head with all of the facial feature details.
- The complete face will then need to be drawn from scratch.
- Drawing digitally can make some of these errors easier to remedy, but it doesn’t mean you shouldn’t learn to draw things correctly.

Make similar progress in each part of the drawing
- Try to maintain an overall level of completion for all the things in your drawing.
- If you are painting eyes, for instance, first draw the outline of each eye, followed by the outline of each iris.
- If the first one is out of place, you will be more likely to notice it and you won’t have to go too far back if you make a mistake if you do this.
Learn basic drawing techniques and do exercise
- You can learn a lot as a beginning artist by doing some relatively easy tasks that involve sketching lines and simple geometric forms.
- These drills will teach you to maintain your composure and see and prevent typical errors. Drawing straight lines in various directions is one of the most fundamental activities.
- Draw straight lines without moving your drawing surface, including diagonals. Along with drawing straight lines, practice drawing curves in various directions.
- Aim for a lovely, smooth curve free of jitters and sudden twists. Do not rotate your drawing area, just like you did for the exercise with straight lines.
- Draw simple shapes like squares, circles, triangles, ovals, and rectangles for practise.
- Try to only use one stroke per side when drawing each shape.
- If your forms don’t come out perfectly, don’t panic; just work to make the next one better. The exercises involving drawing might also be combined.
- For instance, you could create a square, then inside it, draw lines connecting each corner to the next, followed by two additional lines passing through the intersection of those lines, and then, inside the square, draw a circle.
- In addition to the advantages listed above, this activity is excellent for developing symmetrical shape drawing skills.
You can learn the fundamentals of sketching anime by completing the tasks and putting the above suggestions into practice. Once you have a somewhat steady hand and decent pen or pencil control, you can graduate to more difficult drawing techniques. These consist of elements like perspective, color, and shading.
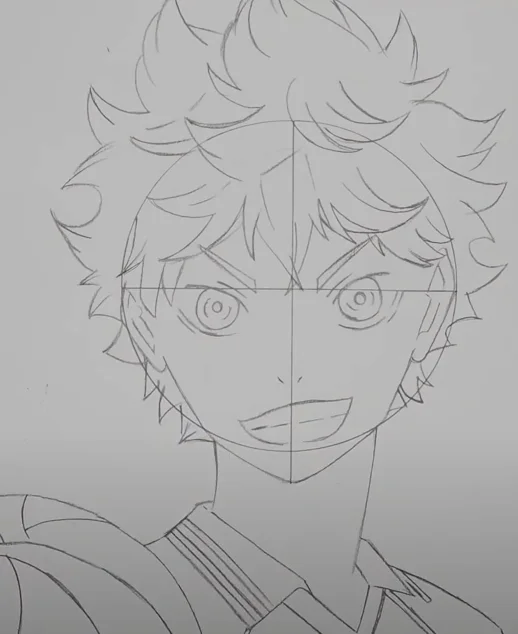
How to draw head or face?
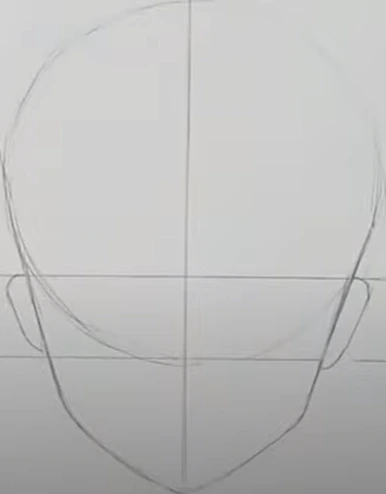
Draw a circle using an upside-down cup or by hand to begin your anime drawing. Your anime character’s face will be created with this. Locate the center of your circle and make a tiny pencil mark there.
From the midway point to the bottom of the circle, divide it into sections using evenly spaced horizontal lines. These instructions will assist you in placing the eyes, nose, and mouth correctly as you learn how to draw anime.
To maintain the face symmetrical, draw a circle with a cross in the center. You can choose the form you wish to give your face as a starting point.
Then, while utilizing the cross as a balancing point, draw the eyes. Don’t forget to include the cross for symmetry as you draw the ears and neck. Keep going with the mouth and nose.
Finish with some hair, which you can style however you like.
Technique:
- Create an oval and divide it into four equal parts.
- This will serve as your anime character’s head’s basic outline. The ratios need not be exact, but the oval should be made thinner at the bottom because that will be the chin.
- Draw a horizontal line through the middle of the oval once it has been created. Once it is done, draw a vertical line in the middle of it, crossing the horizontal line.
- These lines will serve as your guidelines as you design the facial characteristics later.
- The bottom of the oval should be made wider such that it is just just narrower than the top if you want your character to have a wider face.
- Alternately, if you desire your figure to have a thin face, make the oval’s bottom even smaller than its top.
- All anime characters have different head shapes, so you can explore until you find a favorite.
How to draw eyes of the anime or manga character?
Begin by adding the anime drawing’s eyebrows as brief arches at the top of the second horizontal line. Then, draw two vertical arches with a line spanning their tops and bottoms between lines three and four.
These will serve as the foundation for your drawing of the anime eyes. Drawing anime eyes can be done in a variety of methods, but one of the simplest for beginners is to draw a semi-circle in the eye’s upper right corner and leave it uncolored while shading the rest of the eye.
This gives the characteristic wide-eyed expression found in anime drawings.
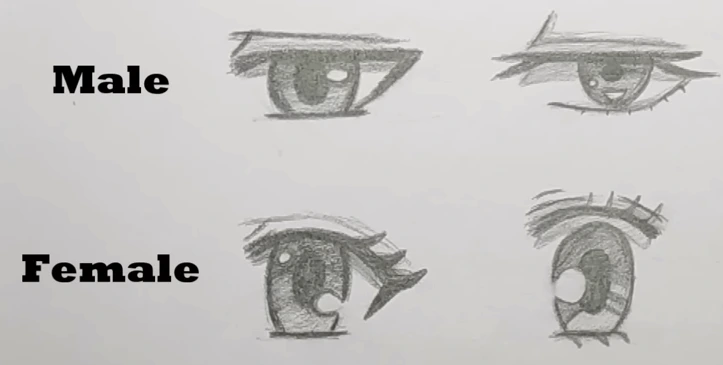
Techniques:
- Draw the eyes such that they are below the earlier-drawn guideline.
- Draw a horizontal line beneath your initial guideline that terminates close to the side of the character’s head if it is a male.
- Draw a curved line beneath your guide that points toward the side of your female character’s head. Anywhere above the nose’s tip should be the location of the eye’s bottom line.
- Draw the other eye on the other side of the face so it appears the same as the other. Check your favorite anime or manga characters for inspiration on how to design your character’s eyes.
- They often have a variety of distinct eye shapes.
- If you want a certain feeling to come over in your character, practice drawing distinct eye expressions.
- A character who is astonished will have wide-open eyes, while an angry one might have narrower eyes. Create brows for your character above the lash line.
- Beginning just above the line you made before, draw the line for your character’s eyebrow over the corner of their eye.
- Draw a line that is slightly inclined or curved, mimicking the form of the top of the eye. The eyebrow can either be left as a basic line or it can be made into a rectangle by extending lines upward from it.
- Once you’ve completed the first one, draw a second brow over the other eye.
Eyebrows in anime and manga can have a variety of shapes, such as triangles or even circles.
If you want to give your character more expression, slant the brows more. For instance, if you angle your character’s eyebrows down toward the nose, they will appear angry; however, if you angle them down toward the ears, they would appear sorrowful or afraid.
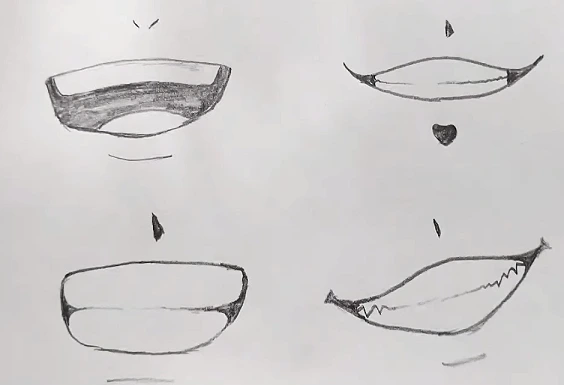
How to draw the mouth of anime character?
Draw a tiny curve or line around the bottom edge of the circle to make a tiny nose, depending on the style you’re looking for. You can start working on your anime mouth drawing using your instructions. The majority of anime mouths are just a slight curve that extends halfway down the face. Your face is beginning to form!
Techniques:
- Put the lips in the middle of the chin and the nose. You can place the mouth by measuring the distance between the character’s chin and mouth.
- Draw a horizontal line that is slightly bent to represent the simple mouth features of a smile or frown.
- Draw a second, slightly thinner line beneath the first to resemble a bottom lip.
- To learn how to make various expressions, look at the many mouths and expressions used by anime characters online.
- You don’t have to draw every single tooth if your character has an open mouth and is smiling. To distinguish the top and bottom teeth, draw a line only there.
Depending on the expression you want your character to have, consider the size of their mouth. Make the mouth wide if you want your character to appear a little sillier. Make the mouth smaller for a quieter or more somber persona.
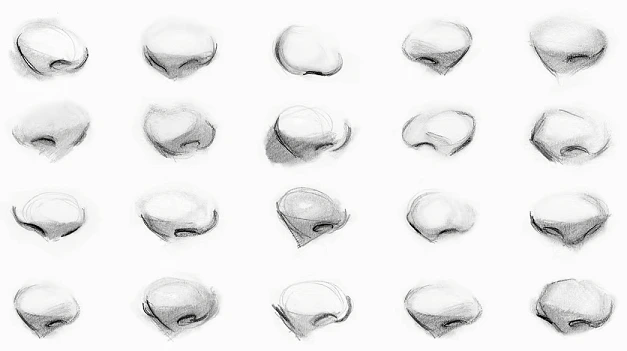
How to draw nose and ears of the character?
Anime characters’ noses are frequently undetectable unless you’re looking at them from the side. At the halfway point between the horizontal line and the chin, draw a brief, straightforward vertical line down the middle of the face to represent your character’s nose.
- If you want the character’s nose to be large, lengthen the line.
- Make your character’s nose the smallest facial feature.
- The vertical line you created will overlap with the nose. Make it darker than the vertical line to make it easier to see, or get rid of the vertical line around the nose.
- Although it’s not always the case, male anime characters can have more prominent noses.
Draw a brief horizontal line under the vertical line to depict the bottom of your character’s nose if you want the nose to stand out more.
Additionally, add a triangle-shaped shadow to the side of the nose to make it appear as though the light is coming from the side.
You don’t even need to draw a nose for some types of anime, like chibi!
Adding the ears:
- To the side of the skull, add the ears.
- Skip sketching the ears if you want your character to have long hair that covers them.
- Draw a small oval on each side of the head, though, if your character’s hair is going to be short.
- The top of the ears should align with the horizontal line that runs down the middle of the face, and the bottoms should do the same.
- The ear flaps should then be drawn inside each oval.
- If you want your character’s ears to be larger or smaller, play about with the size.
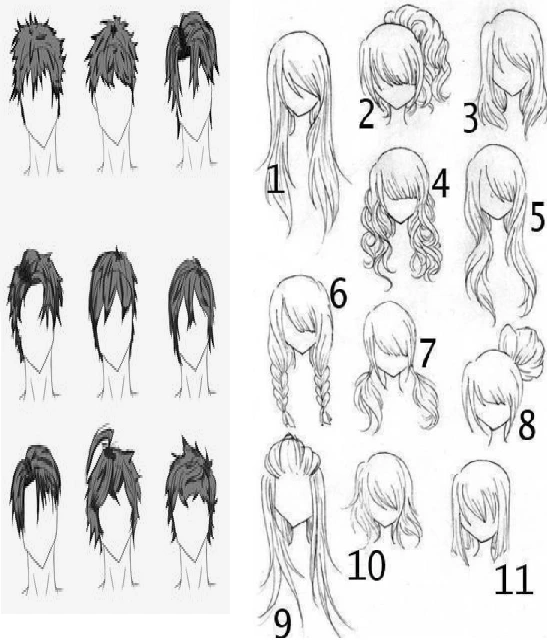
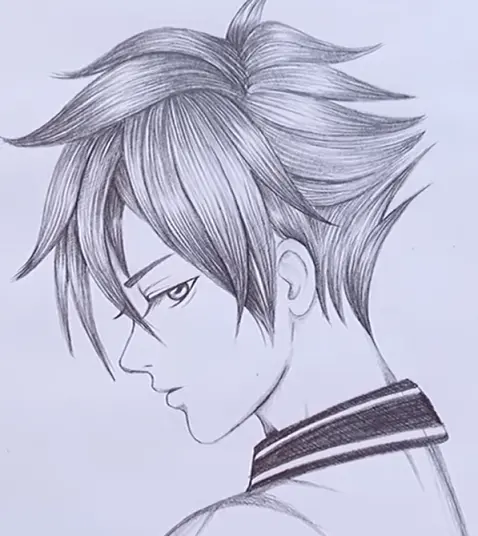
How to draw hairstyle to the anime?
Choose a haircut that you believe will suit your character’s features the best because anime and manga characters can have a variety of hairstyles.
Instead of creating each individual hair, just sketch the general outline of the style onto your character. Work quickly and gently in pencil so you can go back and edit if necessary. Once the initial outline of the hairstyle has been created, remove any sections of the head that the hair covers to make them invisible.
Hair in anime and manga is frequently arranged in clumps with pointed ends. To acquire ideas for how to style your character’s hair, look at the hairstyles of other characters.
To avoid having to erase your character if you don’t like the style you sketched, practise drawing other hairstyles over your design on a piece of tracing paper.
Techniques:
- It’s a good idea to sketch a simple contour of the head before beginning to draw the hair.
- It will be simpler to gauge the volume of the hair if you sketch a picture of the head, and you may also be able to steer clear of blunders.
- Add the hairline once you’ve drawn the head. You can place the front and side sections of the hair by looking at the hairline.
- For instance, the skin shouldn’t truly be visible between the cracks in the hair clumps that extend past the hairline.
- Start with the front area of your hair for this haircut.
- Draw the side clusters pointing more in the direction of their respective sides, and the middle clumps pointing more downward.
- Include the side segment with the backdrop one that is somewhat obscured by the head. After completing this process, remove the hairline.
- The final portion of hair should be added last, with the top half resembling the shape of the head and the bottom splits.
- Once the hair is drawn, remove it from every area of the head that it touches to create a neat and tidy drawing.
Giving finishing touches to the drawing
You’re almost done with your anime drawing! For the neck, draw two vertical lines just beneath the face. Depending on how narrow or wide the neck should be, place these lines as closely together as you desire.
Depending on whether you’re sketching an anime girl or an anime boy, anime hair will make the largest difference in your drawing.
Draw a little dot for boy hair approximately an inch above the top of the face circle. Draw curving lines downward from here to produce the typical floppy haircut for male characters. To frame them out, make forms that resemble palm trees by looping up the lines on the other side of your first lines.
Start with the same curved lines for girl characters that you would for boy characters, but limit them to one or two lines. Then, to produce longer hair, you will draw larger, curved lines around the edge of the face.
To make the hair stand out, shade its edges and draw any additional lines you see fit to give it more structure. Your drawing is complete once you’ve added the hair, so you can delete your initial guidelines.
Other Tips:
- Add little finishing touches to your character’s face, such as freckles or wrinkles. Work on adding any details to give your character a unique identity after you have finished with the hair and removed the instructions.
- Give them moles, wrinkles, or freckles on their cheeks to make them look more interesting.
- Any jewelry or accessories you desire should be sketched in pencil so they can be removed if you change your mind.
- If you don’t want to, you are under no need to give your character any extra details.
- Use your pencil to add shading to the face to give it more depth. Apply a light shadow using the side of your pencil under your character’s chin, bottom lip, and hair.
- For a consistent appearance, make sure to draw each shadow by moving your pencil in the same manner.
- If you want to create darker shadows, squeeze the pencil harder.
- Make sure your shadows aren’t too dark or they’ll look harsh and be challenging to remove.
- Find an excellent teacher if you wish to improve your drawing abilities.
- Make lots of sketches. Look up sketching.
- Develop your artistic eye.
How to draw the body?
Follow the following simple steps in order to complete the body figure of your anime character drawing.
Step 1: Make a stick-figure outline of the body of your character
The arms, torso, and legs should all be in straight lines. Make the legs about a third longer than the arms, and the length of the torso should be equivalent. The hands and feet should then be drawn as triangles or ovals.
Make the feet approximately 1/6 the length of the legs and the hands approximately 1/5 the length of the arm.
Make your stick figure outline around seven times as tall as your character’s head to achieve the proper proportions.
Start the arm lines about one-fifth of the way down the torso line.
Put your character’s stick figure outline in whichever position you want them to be in.
Draw your character’s legs bent, for instance, if you want them to be seated. Alternatively, draw one of your characters’ arms bent if you want them to be waving.
Step 2: Describe the basic bodily shapes of your character
Draw a basic shape of the torso, arms, hips, and legs of your character over the stick-figure outline you created. Don’t worry about the outline being exact just yet. Right now, all you need to do is use simple shapes to depict the various bodily parts.
For the upper and lower arms and legs, draw ovals. Next, draw circles at the knee and elbow joints. Make your character’s higher and lower arms proportionally equal in size. Make the lower legs thinner and the top legs thicker.
Draw a quadrilateral with a wider top and a narrower bottom for the torso. The broad corners at the top will eventually develop into your character’s shoulders.
Draw an oval across the junction of the torso and upper legs to indicate the contour of the hips.
It’s common for anime characters to be tall and lean, but you can try out numerous heights and body types!

Step 3: Describe the basic bodily shapes of your character
Your general shapes need to be connected and improved. To create a single, seamless outline, trace around the character’s body’s outer edges. Start adjusting the various body parts at this point to make them appear more lifelike, such as the hands, shoulders, hips, and neck of your character.
- When you’re done, the earlier, more general outlines you drew will be surrounded by a complete, in-depth outline of your character’s body.
- Draw around the outer borders of each object that makes up the legs (the ovals for the upper and lower legs, the circles for the knees, and the shapes you made for the feet) to create a single, seamless outline of each leg. This will help you connect and improve the legs.
- To make the legs appear natural, make the outline smooth (without any gaps). You would do the same with the arms and torso for the upper body.
- Draw two lines curving upward and away from the middle of the body to represent the neck, then round the corners of the torso to represent the shoulders.
- Additionally, join the upper legs and the torso to the outline you sketched for the hips. Broaden the chest, waist, and shoulders while creating a male anime character.
- Narrow the shoulders, make the hips wider, and define the breasts while creating a female anime character. Also, reduce the waist’s size to make it smaller.
Step 4: Delete the shapes and outline of the stick figures you drew
To avoid mistakenly erasing any of the final, well-defined shapes you made, be cautious when erasing. When you’re done, the original guidelines you drew inside the body of your character should be gone, leaving you with a clean, seamless shape of their body.
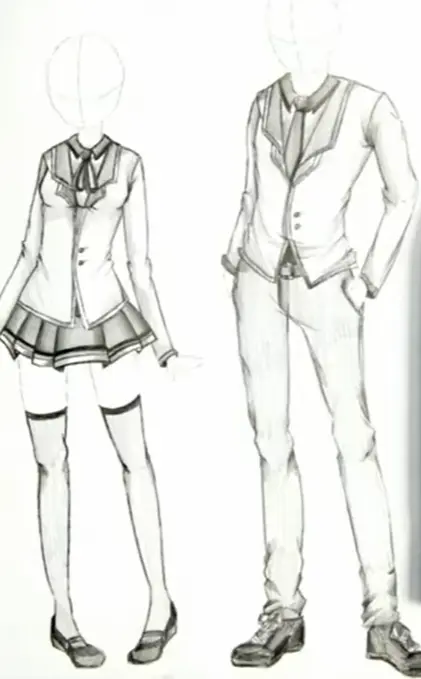
How to draw clothes to the figure?
Depending on how you want your character to be clothed, there will be variations in the anime clothes drawing. Simple shirt designs are the best place for novices to start.
Draw downward-sloping lines in around neck of your character, leaving a tiny space in the middle to represent an open-collar shirt.
Add a thin line where the elbow crease would be on the arms, and two slightly curved lines for the ends of the sleeves at the wrists. Draw a straight line from the open shirt to the waist from this point, leaving an upside-down V shape at the bottom.
To make the ends of the shirt, draw two lines from either side of the hips inward until they intersect the bottom of the V shape. The buttons are a few dots up the centerline.
When it comes to drawing anime clothes, long pants or jeans are the simplest addition to your character. Draw some slightly curved lines along the outside edge of the leg lines you’ve just drawn to give the look of baggy pants (you’ll be erasing the leg lines once the pants are finished).
From here, draw a few light lines around the knees to represent the natural crease of the pants and curved lines around the ankles to create a pooling effect.
To make the shirt’s ends, draw two lines that converge at the bottom of the V shape from either side of the hips. You can see the buttons a few dots up the centerline.
When it comes to creating anime clothing, adding long pants or jeans to your character is the easiest option.
To give the idea that the trousers are saggy, add some slightly curved lines along the outside edge of the leg lines you’ve previously drawn (you’ll be removing the leg lines once the pants are finished).
Create a pooling effect at the ankles by drawing curved lines around them, and the natural crease of the pants can be created by drawing a few light lines around the knees.
Other Tips:
- Consider where the clothing would naturally crumple and fold if it were being worn when you draw the garments.
- After that, add folds and creases to give the clothing a more lifelike appearance. To observe how things crease, you may also view internet photographs of clothing.
- Your anime character can wear any kind of attire.
- Consider wearing traditional anime costume, such as formal gowns and suits, school uniforms, or traditional Japanese garb.
- Find an excellent teacher to help you develop your drawing abilities.
- Make a lot of sketches and read up on drawing.
You can watch the following tutorial on YouTube to understand how it is done:

In case you want to introduce anime characters and make a video about the same then you can try using the free video editor CapCut.
Drawing an anime girl character – steps
Follow these steps to make a simple anime girl character:
Step 1: Draw simple face outline
Draw two vertical lines of the same length at the width you choose for the face at the beginning of your anime girl design. Drawing two lines that slope toward the center and leaving a tiny space between them will allow you to draw the horizontal line for the chin from this point on.
Step 2: Include other face features
The two circles you draw on the middle guideline should have a slight hole at the bottom for your eyes. The eyes are one of the most significant features and are typically significantly larger than the other face features when drawing anime.
To frame the eyes, draw an arch over the top of each circle and a curved line around its far side.
From here, you can also draw a small V shape for the nose in the center of the guideline, a slightly curved line for the mouth while smiling, and a few brief, light pencil strokes beneath the eyes to simulate blushing.
Step 3: Putting Finishing touches
When creating anime hair, there are countless distinct looks to choose from.
Draw sloping lines around the top of the face above the eyes to make this straightforward.
To produce bangs, you can have the majority of these moving in one way and a few moving in the opposite direction with a tiny space in between (which is very common in anime drawings).
Draw lines down and around the face over the top of the head, pushing these up towards to the face out from bottom with shorter lines.
You will then have short hair for your female character as a result.
Drawing an anime boy character – steps
Follow these steps to make a simple anime boy character:
Step 1: Create the Face Structure and Neck
Drawing an anime boy character is quite similar to drawing an anime girl. Before you add the amusing facial traits, you should first create the face and neck’s contour.
Lightly draw a freehand circle with a vertical baseline going straight down the center. This should extend as far as you’d like the chin to be past the bottom of the circle.
Then, draw a vertical line, dipping in more toward the bottom, that runs down each edge of the circle. The bottom of the face will be where these connect.
Create two vertical lines for the head and two lines off to the sides for the tops of the shoulders underneath the face.
Step 2: Draw the Eyes, Nose, and Mouth
On either side of the face, create two half-oval shapes with short, curved lines within for the ears.
You’ll begin focusing on the largest feature—the eyes—by moving inside the face circle and aligning yourself with the ears.
Drawing anime eyes can be challenging, but remember to simplify it by breaking it down into shapes.
Start by drawing two curving lines on either side, with the width of the space between them representing the size of the eyes.
Draw the curved lines for the eyes next, followed by a lighter curved line for the eyebrows.
The pupils should be shaded in as a little circle at the top of the eyeballs, and the eyelashes should be added as a few short lines on the curving lines below.
Add a little V-shape or two short lines along the middle guideline to represent the nose. Include this to finish the features since the majority of anime mouth drawings consist of a single line in the lower third of the face.
Step 3: Sketching the hair
Draw curved lines around the face’s edges beginning at the center point just above the top of the face. It’s normal for anime hair to be a little unkempt, so don’t stress about it being flawless.
To give your anime boy drawing an even more vintage appearance, you can even begin to draw these down over the front of the face.
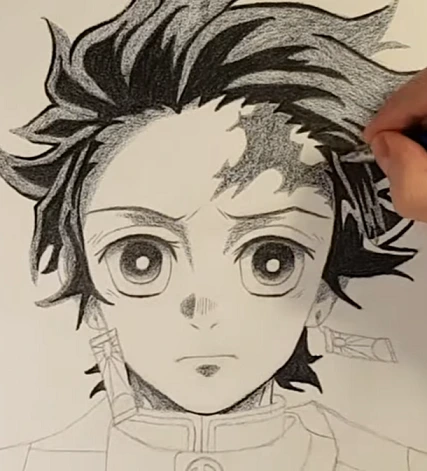
To make your design stand out more and prepare it for coloring if you want to add more, lastly, write over the top of your pencil lines with a pen.

Summary
You can make your own anime characters with the help of many web sites. To locate various haircuts, outfits, and body positions, Google Images and Pinterest are usually wonderful places to start.
Additionally, there are a tones of other online resources and classes that teach pencil or digital skills for drawing anime and manga characters. You’ll quickly become an expert!